
JavaScript: Form Validation
Validating form input with JavaScript is easy to do and can save a lot of unnecessary calls to the server. It can prevent people from leaving fields blank, from entering too little or too much or from using invalid characters.
User-submitted data should also always be verified using a secure server-side script. Otherwise a browser with JavaScript disabled, or a hacker trying to compromise your site, can easily by-pass client-side validation.
For an alternative approach to client-side form validation, without JavaScript, check out our new article on HTML5 Form Validation which is available now in most modern browsers.
Restricting input to alphanumeric characters
In the following example, the single input box, inputfield, must: a) not be empty; and b) contain only alphanumeric characters and spaces. Only if both tests are passed can the form be submitted (when the script returns a value of true).
<script>

  function checkForm(form)
  {
    // validation fails if the input is blank
    if(form.inputfield.value == "") {
      alert("Error: Input is empty!");
      form.inputfield.focus();
      return false;
    }

    // regular expression to match only alphanumeric characters and spaces
    var re = /^[\w ]+$/;

    // validation fails if the input doesn't match our regular expression
    if(!re.test(form.inputfield.value)) {
      alert("Error: Input contains invalid characters!");
      form.inputfield.focus();
      return false;
    }

    // validation was successful
    return true;
  }

</script>
The pre-defined class \w represents any alphanumeric character or the '_' underscore.
The regular expression ^[\w ]+$ will fail if the input is empty as it requires at least one character (because we used + instead of *). The first test in the example is therefore only necessary in order to provide a different error message when the input is blank.
The purpose of a form validation script is to return a boolean value (true or false) to the onsubmit event handler. A value of true means that form will be submitted while a false value will block the form from being submitting. The focus() command is used to set the focus to the problem element.
You can test the above script with different input values using this form:
The form HTML is put together as follows:
<form method="POST" action="form-handler" onsubmit="return checkForm(this);">
<p>Input: <input type="text" size="32" name="inputfield">
<input type="submit"></p>
</form>
The name attribute of the input field is used to reference that field from within the checkForm function. With the advent of DHTML it's tempting to use id to reference form fields, but that can lead to namespace conflicts and why make things more complicated than necessary.
When the form is submitted - either by hitting Enter or clicking on the Submit button - the onsubmit handler is triggered. This then calls our checkForm() function, passing a reference to itself (the form) as the only variable.
This makes the value of the input box available within the function as form.inputfield.value (the value of the field called 'inputfield' belonging to the form). In special cases, when the name is a variable or contains special characters, you might also see form.elements[inputfield].value.
Other form values are available using a similar syntax, although this becomes more complicated if you're using SELECT lists, checkboxes or radio buttons (see below for examples).
The checkForm function tests the form input against our conditions, returning a value of true if the form is to be submitted (when all tests have been passed) or false to abort (cancel) the form submission. It's that simple.
In a real-life situation you will most likely have more fields to check, and more complicated conditions, but the principle remains the same. All you need to do is extend the checkForm function to encompass the new fields and conditions:
<script>

  function checkForm(form)
  {
    if(!condition1) {
       alert("Error: error message");
       form.fieldname.focus();
       return false;
    }
    if(!condition2) {
       alert("Error: error message");
       form.fieldname.focus();
       return false;
    }
    ...
    return true;
  }

</script>
When a return command is encountered, execution of the function is halted. In other words if the first condition fails, the second condition will not be tested and so forth. Only when all conditions have been satisfied do we reach the return true command, in which case the form will be submitted.
You'll see that the all validation scripts presented on this and subsequent pages adhere to the same basic format.
Most modern browsers now support HTML5 Form Validation making it possible to validate form elements without (or before) any JavaScript is triggered.
Validating Text Input Fields
The value of a text input box (or a textarea or password input) is available using the syntax form.fieldname.value. This is not the case for other input types.
form.fieldname.value
To check whether two inputs have the same is quite simple:
if(form.field1.value == form.field2.value) {
  // values are identical
}
Make sure to always use == for comparisons. If you use = (the assignment operator) instead then it can take a long time to debug.
and to see if they have different values we just reverse the logic:
if(form.field1.value != form.field2.value) {
  // values are different
}
If you want to test numeric values (or add or subtract them) then you first have to convert them from strings to numbers. By default all form values are accessed as as strings.
  var field1 = parseInt(form.field1.value);
  var field2 = parseInt(form.field2.value);
  if(field1 > field2) {
    // field1 as a number is greater than field2 as a number
  }
parseFloat is the same as parseInt except that it also works for floating point numbers.
Validating Drop-down Lists
The value of a SELECT input element is accessed using:
var selectBox = form.fieldname;
var selectedValue = selectBox.options[selectBox.selectedIndex].value
var selectedText = selectBox.options[selectBox.selectedIndex].text
where fieldname is the SELECT element, which has an array of options and a value selectedIndex that tells you which option has been selected. The illustration below shows this relationship:
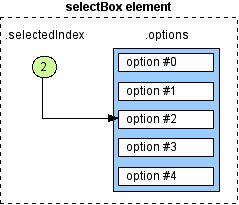
Note that the 'I' in selectedIndex needs to be capitalised - JavaScript functions and variables are always case-sensitive.
If you define a value for the OPTION elements in your SELECT list, then .value will return that, while .text will return the text that is visible in the browser. Here's an example of what this refers to:
<option value="value">text</option>
Thanks to Internet Explorer you can now access the current SELECT value using selectBox.value, but this is not good practice.
If you just want to check that an option has been chosen (ie. that the SELECT box is no longer in it's default state) then you can use:
if(form.fieldname.selectedIndex > 0) {
  // an option has been selected
} else {
  // the default first option remains selected
}
See below for a function for validating both SELECT and multi-SELECT lists.
Validating Checkboxes
These really are simple:
form.checkboxfield.checked
will return a boolean value (true or false) indicating whether the checkbox is in a 'checked' state.
  function checkForm(form)
  {
    if(form.checkboxfield.checked) {
      alert("The checkbox IS checked");
    } else {
      alert("The checkbox IS NOT checked");
    }
    return false;
  }
You don't need to test using form.checkboxfield.checked == true as the value is already boolean.
Read more about the humble checkbox in our HTML5 Checkbox Validation article.
Validating Radio buttons
Radio buttons are implemented as if they were an array of checkboxes. To find out which value (if any) has been selected, you need to loop through the array until you find which one has been selected:
<script>

function checkRadio(field)
{
  for(var i=0; i < field.length; i++) {
    if(field[i].checked) return field[i].value;
  }
  return false;
}

</script>
The form handler function is then the following:
function checkForm(form)
{
  if(radioValue = checkRadio(form.radiofield)) {
    alert("You selected " + radioValue);
    return true;
  } else {
    alert("Error: No value was selected!");
    return false;
  }
}
Actually, there is a bug in the above function in that it doesn't handle the case when there is only a single radio button. In that case field.length is undefined and the function will always return false. Below is a patched version:
function checkRadio(field)
{
  if(!field.length) {
    field = [field];
  }
  for(var i=0; i < field.length; i++) {
    if(field[i].checked) return field[i].value;
  }
  return false;
}
In the case of a single radio button we put the single value into its own Array so we can use the same for loop after all.
ES6 Syntax
In modern browsers we can make some small optimisations:
<script>

// Original JavaScript code by Chirp Internet: chirpinternet.eu
// Please acknowledge use of this code by including this header.

const checkRadio = (field) => {
  if(!field.length) {
    field = [field];
  }
  for(let el of field) {
    if(el.checked) {
      return el.value;
    }
  }
  return false;
}

</script>
Where const means the function is immutable; (...) => represents a function; for...of iterates over a NodeList; and let defines a locally scoped variable.
Validating Checkbox arrays
If you're working with arrays of checkboxes to submit data to a server-side script then you might already have some grey hairs from trying to figure out how to validate the input using JavaScript.
The problem is that, to have the data submitted in a 'nice' format to the server, the name attributes of all the checkboxes in the array are often set to the same value: a name ending with []. This makes it difficult to address them directly using JavaScript.
In this example, the checkboxes are defined as:
<input type="checkbox" name="pref[]" value="value"> label
When you submit the form you will be notified through an alert message how many items you checked, and what they were. This is calculated using a new function:
<script>

function checkArray(form, arrayName)
{
  var retval = new Array();
  for(var i=0; i < form.elements.length; i++) {
    var el = form.elements[i];
    if(el.type == "checkbox" && el.name == arrayName && el.checked) {
      retval.push(el.value);
    }
  }
  return retval;
}

</script>
The form handler that calls this function and displays the alert is as follows:
function checkForm(form)
{
  var itemsChecked = checkArray(form, "pref[]");
  alert("You selected " + itemsChecked.length + " items");
  if(itemsChecked.length > 0) {
    alert("The items selected were:\n\t" + itemsChecked);
  }
  return false;
}
The checkArray function returns an array containing all the selected checkbox values.
Normally you would modify this so that you could submit or not submit the form based on the number of items selected. For example "at least two" or "no more than five". This should be a simple exercise.
ES6 Syntax
Again, we can make the code a lot simpler in supporting browsers:
<script>

// Original JavaScript code by Chirp Internet: chirpinternet.eu
// Please acknowledge use of this code by including this header.

const checkArray = (form, arrayName) => {
  let retval = [];
  for(let el of form.elements) {
    if(el.type == "checkbox" && el.name == arrayName && el.checked) {
      retval.push(el.value);
    }
  }
  return retval;
};

</script>
Validating Multi-Select Boxes
A variation on the standard SELECT input list, is the multiple select list which allows for any number of options to be selected from a single list:
If we try to use selectedIndex as before we only receive the index of the first selected item in the list. So instead we have to use the elements selectedOptions NodeList to identify all the selected options.
With a bit of ingenuity we can create a single method to handle both the singular and multiple select lists returning, respectively, a single object {value, text} or an array of objects:
<script>

// Original JavaScript code by Chirp Internet: chirpinternet.eu
// Please acknowledge use of this code by including this header.

const checkSelect = (field) => {
  let retval = [];
  for(let el of field.selectedOptions) {
    retval.push({
      value: el.value,
      text: el.text
    });
  }
  return (field.multiple) ? retval : retval[0];
};

</script>
We can invoke this method from our checkForm function as follows:
<script>

  const checkForm = (form) => {

    let fruit = checkSelect(form.fruit);
    alert("Fruit: " + fruit.value);

    let fruits = checkSelect(form.elements["fruits[]"]);
    let fruitList = [];
    for(let obj of fruits) {
      fruitList.push(obj.value);
    }
    alert("Fruit Salad: " + fruitList);

    return false;
  };

</script>
From the code you can see that our SELECT inputs are named fruit for the normal drop-down list, while the multi-select list is named fruits[]. The [] suffix tells a server side script such as PHP to accept multiple values with that name into an array.
Note that in this section we've been using the new ES6 syntax which may not be available in all browsers.
Combining Form Elements in Conditions
In more complicated forms you will want to set conditions on the form that combine multiple elements. For example, a text input that only needs to have a value if a checkbox is checked:
<script>

  const checkForm = function(form) {
    ...

    if(form.checkboxname.checked && (form.textinputname.value == "")) {
      alert("Error: error message");
      form.textinputname.focus();
      return false;
    }

    ...
    return true;
  };

</script>
or conditions that vary according to a radio button selection:
<script>

  var checkRadio = function(field) {
    if(!field.length) {
      field = [field];
    }
    for(var i=0; i < field.length; i++) {
      if(field[i].checked) return field[i].value;
    }
    return false;
  };

  var checkForm = function(form) {
    ...

    var radioValue = checkRadio(radiofield);
    switch(radioValue)
    {
      case "Red":
        // conditions to apply if 'Red' is selected
        break;

      case "Blue":
        // conditions to apply if 'Blue' is selected
        break;

      default:
        // conditions to apply in all other cases

    }

    ...
    return true;
  };

</script>
Using simple logical operators and the functions supplied above you can do all sorts of client-side form validation. To take things a step further you can even explore Ajax Form Validation which lets you supply real-time feedback using server-side scripts triggered by JavaScript events.
Video Tutorial
The team at Webucator.com have made a video based on this article as a part of their JavaScript training lessons which you can view below. It explains some of the code examples above as well as introducing more advanced concepts:
Separating FORM from function
We would be remiss in not pointing out that your JavaScript and HTML code should be kept separated as far as possible. In other words, instead of:
<form ... onsubmit="return checkForm(this);">
...
</form>

<script>

  function checkForm(form) {
    if(!condition) {
      return false;
    }
    return true;
  }

</script>
it's better practice to use:
<form id="myForm" ...>
...
</form>

<script>

  var checkForm = function(e) {
    var form = e.target;
    if(!condition) {
      e.preventDefault();
      return;
    }
  };

</script>
with the submit handler applied using:
<script>

  document.getElementById("myForm").addEventListener("click", checkForm, false);

</script>
Our checkForm function then needs to be defined as a variable (var or const), and instead of returning false we use e.preventDefault() to prevent form submission, and there's no need to return true.
Related Articles - Form Validation
- HTML HTML5 Form Validation Examples
- HTML Validating a checkbox with HTML5
- JavaScript Preventing Double Form Submission
- JavaScript Password Validation using regular expressions and HTML5
- JavaScript Counting words in a text area
- JavaScript Tweaking the HTML5 Color Input
- JavaScript Date and Time
- JavaScript Form Validation
- JavaScript Allowing the user to toggle password INPUT visibility
- JavaScript A simple modal feedback form with no plugins
- JavaScript Credit Card numbers
- PHP Protecting forms using a CAPTCHA
- PHP Measuring password strength
- PHP Creating a CAPTCHA with no Cookies
- PHP Basic Form Handling in PHP
Samson Royal 7 March, 2021
I would like to validate input fields such that they are highlighted in a red color in case a user leaves them empty or doesn't fill them. How do I do that?
SN Vishwakarma 3 November, 2018
Thanks for form validation but how to give the message like when user submit the form message come as HTML required field
I think you're referring to: HTML5 Form Validation
Laura 1 March, 2017
Thank you very much.
This is the clearest exposition of form-handlers I've seen so far. Much appreciated
Antony 20 September, 2016
Your video example is nice... instead of alert msgs... how i have to show the error message in html page itself. I need to show the error msg below the text field.
Gareth 15 September, 2016
Very new to coding. Couldnt get your form validator to work at all. Would be great if you could post full examples of code including form and not just pieces that fit into the greater framework of code.
I've coded a working form, all checks are great but for some reason the hardest part is trying to stop form submission before validation. So i have places to insert the stop validation code, but just cant find any that works.
I tested your first piece of code on a form and it does not work at all. Tried setting it up on onsubmit on both form and button and no go.
rayvandi 29 August, 2016
if(form.field1.value == form.field2.value) {// values are identical
}
thank you so much !
i've been looking this code for 2 hours and found this code finally :v lol that is so simple code :v and that give me a headache to found out.
Rama 16 July, 2013
Hi !
nice work nice tutorial!
Could you just give the code that change the "!" to "v" when the captcha is correct?
Thx a lot !
This is done using HTML5 form validation techniques and CSS, but it only validates the input format (pattern) and not the actual values. That could be done using Ajax, but would make the CAPTCHA much easier to break.
JackLloyd, 27 October, 2010
Very handy, everything else I found was rubbish but this gave me exactly what I wanted with minor modification (removed '+' character) - needed to alert user if 'username' contained a space /anywhere/ in the field. Hope the following tags help SEO..
tags: Javascript field validation no spaces alert
Mike Jeffree 27 August, 2010
Hi - Is it possible to have a checkbox, that has a default of checked, so that the user HAS to enter info into the textarea.
But if the user unchecks the box, the user DOESNT have to enter info in textarea.
Any help would be most appreciated.
I've added some code for this in the section "Combining Form Elements in Conditions"