
System: Adding a watermark using ImageMagick
ImageMagick is a very powerful tool for manipulating and combining images. We use it mainly for resizing, cropping and resizing uploaded images, but also sometimes for adding watermarks.
On most installations, ImageMagick can also be called from PHP using the system or exec function call. The following examples use only the command-line approach.
Applying a watermark
Watermarking is the practice of overlaying one image, often with transparent regions or a drop shadow, over a photo to indicate ownership. The images don't have to be the same size or even the same format.
In practice the watermark will often be in PNG format (allowing for alpha-transparency) and the target photo in the common JPEG format. Many other formats are also supported by ImageMagick by default.
The basic syntax we are using is:
COMPOSITE=/usr/bin/composite
$COMPOSITE -gravity SouthEast watermark.png input.jpg output.jpg
where $COMPOSITE is the path to the ImageMagick composite function, watermark.png and input.jpg are the images to be combined, and output.jpg is where to place the resulting image.
To add a watermark to photo in-place you can use the same addresss for both input.jpg and output.jpg and the original photo will be replaced with the watermarked version. Make sure to have a backup before modifying images in place.
The -gravity option indicates where to place the watermark in the case that it is smaller than the target photo.
Some other common options we've used are:
- -compose screen to change the composition method. Other options include "multiply", "difference" or "exclusion"; and
- -geometry +5+5 to move the watermark 5 pixels in from the selected corner.
So the command could become:
$COMPOSITE -compose multiply -gravity SouthWest -geometry +5+5 watermark.png target.jpg target.jpg
This adds the watermark using multiply to the bottom left corner with 5 pixels padding. The target image is edited in place.
Applying a watermark to a directory of photos
To add a watermark to a batch of images we could just repeat the above command manually for each photo in a directory, but that's not very efficient if you're working with a large number of photos.
This is where some command-line skills come in handy:
COMPOSITE=/usr/bin/composite
ls -1 photos/product_*.jpg \
    | awk -F\/ '{print "$COMPOSITE -gravity SouthEast watermark.png photos/"$(NF)" watermarked/"$(NF)}' \
    | sh
Too complicated? What we're doing is applying our watermark to all the photos in a directory /photos/ where the filename matches product_*.jpg (* is a file system wildcard). The output directory /watermarked/ will need to be created first.
The command can be broken down as follows:
List all matching files
$ ls -1 photos/product_*.jpg
photos/product_1.jpg
photos/product_2.jpg
photos/product_3.jpg
photos/product_4.jpg
...
Just the file names
$ ls -1 photos/product_*.jpg | awk -F\/ '{print $(NF)}'
product_1.jpg
product_2.jpg
product_3.jpg
product_4.jpg
...
Output the src and target addresses
$ ls -1 photos/product_*.jpg | awk -F\/ '{print "photos/"$(NF)" watermarked/"$(NF)}'
photos/product_1.jpg watermarked/product_1.jpg
photos/product_2.jpg watermarked/product_2.jpg
photos/product_3.jpg watermarked/product_3.jpg
photos/product_4.jpg watermarked/product_4.jpg
...
Build the full command
$ ls -1 photos/product_*.jpg \
    | awk -F\/ '{print "$COMPOSITE -gravity SouthEast watermark.png photos/"$(NF)" watermarked/"$(NF)}'
$COMPOSITE -gravity SouthEast watermark.png photos/product_1.jpg watermarked/product_1.jpg
$COMPOSITE -gravity SouthEast watermark.png photos/product_2.jpg watermarked/product_2.jpg
$COMPOSITE -gravity SouthEast watermark.png photos/product_3.jpg watermarked/product_3.jpg
$COMPOSITE -gravity SouthEast watermark.png photos/product_4.jpg watermarked/product_4.jpg
...
Finally we pipe these commands through the shell to have the command executed for every photo.
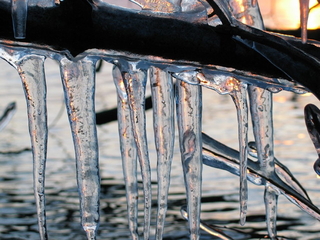
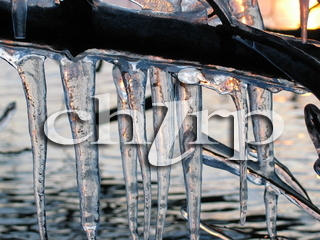
Sample watermark and output
As an example we've taken a version of our company logo and a random winter photo to be watermarked. The command executed for this example was:
COMPOSITE=/usr/bin/composite
$COMPOSITE -gravity Center watermark.png input.jpg ouput.jpg
Below you can see the two input images (the watermark is actually smaller) and the resulting combined photo:
 |
 |
 |
|
We would normally apply ImageMagick commands using PHP as each photo is uploaded, creating various image sizes and adding watermarks as required.
Being able to apply or re-apply watermarked using the command-line is most useful when something has gone wrong or the requirements changed. In those situations it's usually easier to work from the command-line than via a PHP script.
Batch resizing images
On a related topic we can also resize a batch of images using ImageMagick on the command-line. The command in this case looks like:
CONVERT=/usr/bin/convert
$CONVERT input.jpg -geometry '320x240' output.jpg
Using a similar technique to that presented above, we can apply this to a batch of photos using:
CONVERT=/usr/bin/convert
ls -1 photos/product_*.jpg \
    | awk -F\/ -v q="'" '{print "$CONVERT photos/"$(NF)" -geometry "q"320x240"q" watermarked/"$(NF)}' \
    | sh
The main differences here are that we've used the convert function of ImageMagick and a special trick in awk to let us include single quotes in the output.
$ ls -1 photos/product_*.jpg \
    | awk -F\/ -v q="'" '{print "$CONVERT photos/"$(NF)" -geometry "q"320x240"q" watermarked/"$(NF)}'
$CONVERT photos/product_1.jpg -geometry '320x240' watermarked/product_1.jpg
$CONVERT photos/product_2.jpg -geometry '320x240' watermarked/product_2.jpg
$CONVERT photos/product_3.jpg -geometry '320x240' watermarked/product_3.jpg
$CONVERT photos/product_4.jpg -geometry '320x240' watermarked/product_4.jpg
...
So to change the watermark on a directory of images you can restore the originals from backup and add the watermark, but if you have a set of larger images, with no watermark, they can be resized down to use as a starting point.
References
Related Articles - Image Manipulation
- PHP Effects of quality setting in JPEG compression
- PHP Extracting colours from an image
- PHP Creating images 'on the fly'
- System Adding a watermark using ImageMagick
Matt 6 September, 2020
I keep getting this notice.
"-gravity: not found"
NG 28 February, 2017
There is typo target file twice at the end (second block)
I think it's correct - we're combining "watermark.png" and "target.jpg" with the output overwriting "target.jpg".
Dez 14 June, 2016
Great tutorial,
Which version of imagemagick you have based this one? Not sure if the Page Last Modified date is for this article, and it still wouldn't cut it as a versioning
Cheers,
Dez
This article was written at least 10 years ago - though the technique is still valid.